UI API
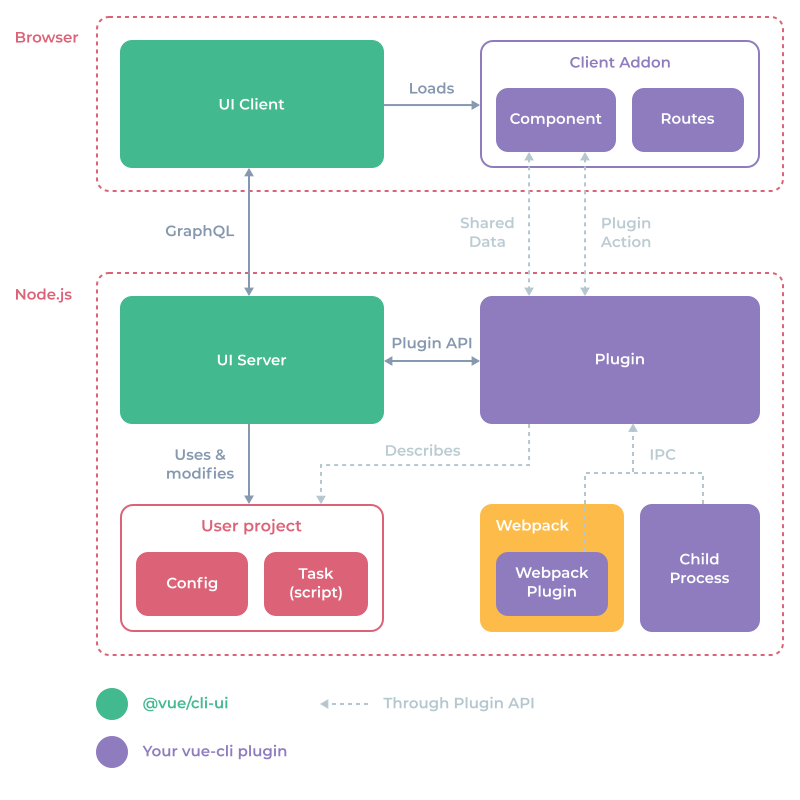
cli-ui 公开了 API,允许您扩展项目配置和任务,以及共享数据并与其他进程通信。
UI 文件
在每个安装的 vue-cli 插件中,cli-ui 将尝试在插件的根文件夹中加载可选的 ui.js 文件。请注意,您也可以使用文件夹(例如 ui/index.js)。
该文件应导出一个函数,该函数将 api 对象作为参数。
module.exports = api => {
  // Use the API here...
}
⚠️ 当在“项目插件”视图中获取插件列表时,这些文件将被重新加载。要应用更改,请单击 UI 左侧导航栏中的“项目插件”按钮。
以下是一个使用 UI API 的 vue-cli 插件的示例文件夹结构
- vue-cli-plugin-test
  - package.json
  - index.js
  - generator.js
  - prompts.js
  - ui.js
  - logo.png
项目本地插件
如果您需要在项目中访问插件 API,并且不想为此创建一个完整的插件,则可以在 package.json 文件中使用 vuePlugins.ui 选项
{
  "vuePlugins": {
    "ui": ["my-ui.js"]
  }
}
每个文件都需要导出一个函数,该函数将插件 API 作为第一个参数。
开发模式
在构建插件时,您可能希望在开发模式下运行 cli-ui,这样它会向您输出有用的日志
vue ui --dev
或者
vue ui -D
项目配置
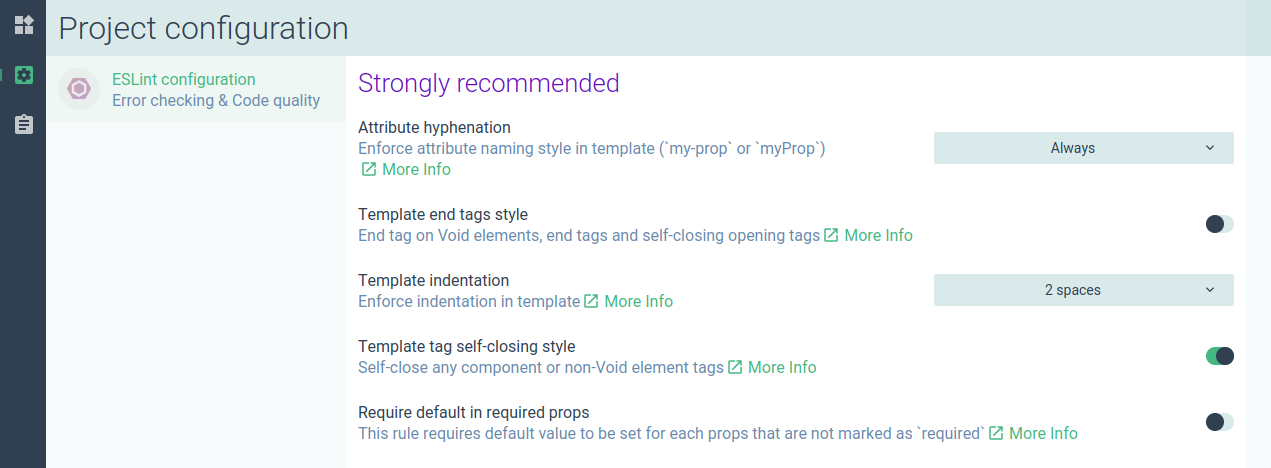
您可以使用 api.describeConfig 方法添加项目配置。
首先,您需要传递一些信息
api.describeConfig({
  // Unique ID for the config
  id: 'org.vue.eslintrc',
  // Displayed name
  name: 'ESLint configuration',
  // Shown below the name
  description: 'Error checking & Code quality',
  // "More info" link
  link: 'https://eslint.org.cn'
})
警告
确保正确命名空间 id,因为它必须在所有插件中都是唯一的。建议使用 反向域名表示法。
配置图标
它可以是 Material icon 代码或自定义图像(请参阅 公共静态文件)。
api.describeConfig({
  /* ... */
  // Config icon
  icon: 'application_settings'
})
如果您没有指定图标,则将显示插件徽标(如果有)(请参阅 徽标)。
配置文件
默认情况下,配置 UI 可能会读取和写入一个或多个配置文件,例如 .eslintrc.js 和 vue.config.js。
您可以提供在用户项目中检测到的可能文件
api.describeConfig({
  /* ... */
  // All possible files for this config
  files: {
    // eslintrc.js
    eslint: {
      js: ['.eslintrc.js'],
      json: ['.eslintrc', '.eslintrc.json'],
      // Will read from `package.json`
      package: 'eslintConfig'
    },
    // vue.config.js
    vue: {
      js: ['vue.config.js']
    }
  },
})
支持的类型:json、yaml、js、package。顺序很重要:列表中的第一个文件名将用于在文件不存在时创建配置文件。
显示配置提示
使用 onRead 钩子返回要为配置显示的提示列表
api.describeConfig({
  /* ... */
  onRead: ({ data, cwd }) => ({
    prompts: [
      // Prompt objects
    ]
  })
})
这些提示将显示在配置详细信息窗格中。
有关更多信息,请参阅 提示。
data 对象包含每个配置文件内容的 JSON 结果。
例如,假设用户在其项目中具有以下 vue.config.js
module.exports = {
  lintOnSave: false
}
我们在插件中声明配置文件,如下所示
api.describeConfig({
  /* ... */
  // All possible files for this config
  files: {
    // vue.config.js
    vue: {
      js: ['vue.config.js']
    }
  },
})
然后 data 对象将是
{
  // File
  vue: {
    // File data
    lintOnSave: false
  }
}
多个文件示例:如果我们在用户项目中添加以下 eslintrc.js 文件
module.exports = {
  root: true,
  extends: [
    'plugin:vue/essential',
    '@vue/standard'
  ]
}
并将插件中的 files 选项更改为以下内容
api.describeConfig({
  /* ... */
  // All possible files for this config
  files: {
    // eslintrc.js
    eslint: {
      js: ['.eslintrc.js'],
      json: ['.eslintrc', '.eslintrc.json'],
      // Will read from `package.json`
      package: 'eslintConfig'
    },
    // vue.config.js
    vue: {
      js: ['vue.config.js']
    }
  },
})
然后 data 对象将是
{
  eslint: {
    root: true,
    extends: [
      'plugin:vue/essential',
      '@vue/standard'
    ]
  },
  vue: {
    lintOnSave: false
  }
}
配置选项卡
您可以将提示组织到多个选项卡中
api.describeConfig({
  /* ... */
  onRead: ({ data, cwd }) => ({
    tabs: [
      {
        id: 'tab1',
        label: 'My tab',
        // Optional
        icon: 'application_settings',
        prompts: [
          // Prompt objects
        ]
      },
      {
        id: 'tab2',
        label: 'My other tab',
        prompts: [
          // Prompt objects
        ]
      }
    ]
  })
})
保存配置更改
使用 onWrite 钩子将数据写入配置文件(或执行任何 nodejs 代码)
api.describeConfig({
  /* ... */
  onWrite: ({ prompts, answers, data, files, cwd, api }) => {
    // ...
  }
})
参数
prompts:当前提示运行时对象(见下文)answers:来自用户输入的答案数据data:从配置文件读取的只读初始数据files:找到文件的描述符({ type: 'json', path: '...' })cwd:当前工作目录api:onWrite API(见下文)
提示运行时对象
{
  id: data.name,
  type: data.type,
  name: data.short || null,
  message: data.message,
  group: data.group || null,
  description: data.description || null,
  link: data.link || null,
  choices: null,
  visible: true,
  enabled: true,
  // Current value (not filtered)
  value: null,
  // true if changed by user
  valueChanged: false,
  error: null,
  tabId: null,
  // Original inquirer prompt object
  raw: data
}
onWrite API
assignData(fileId, newData):使用Object.assign在写入之前更新配置数据。setData(fileId, newData):newData的每个键都将被深度设置(如果值为undefined则删除)到配置数据中,然后写入。async getAnswer(id, mapper):检索给定提示 id 的答案,并在提供的情况下通过mapper函数映射它(例如JSON.parse)。
示例(来自 ESLint 插件)
api.describeConfig({
  // ...

  onWrite: async ({ api, prompts }) => {
    // Update ESLint rules
    const result = {}
    for (const prompt of prompts) {
      result[`rules.${prompt.id}`] = await api.getAnswer(prompt.id, JSON.parse)
    }
    api.setData('eslint', result)
  }
})
项目任务
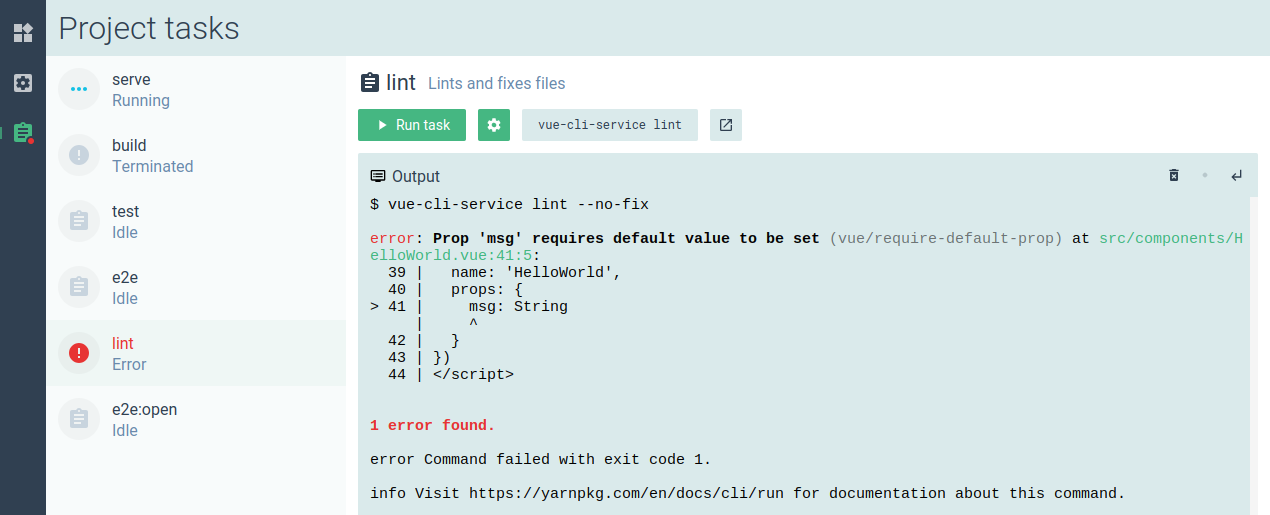
任务是从项目 package.json 文件中的 scripts 字段生成的。
您可以使用 api.describeTask 方法为任务添加更多信息和钩子
api.describeTask({
  // RegExp executed on script commands to select which task will be described here
  match: /vue-cli-service serve/,
  description: 'Compiles and hot-reloads for development',
  // "More info" link
  link: 'https://github.com/vuejs/vue-cli/blob/dev/docs/cli-service.md#serve'
})
您也可以使用函数作为 match
api.describeTask({
  match: (command) => /vue-cli-service serve/.test(command),
})
任务图标
它可以是 Material icon 代码或自定义图像(请参阅 公共静态文件)。
api.describeTask({
  /* ... */
  // Task icon
  icon: 'application_settings'
})
如果您没有指定图标,则将显示插件徽标(如果有)(请参阅 徽标)。
任务参数
您可以添加提示来修改命令参数。它们将显示在“参数”模态框中。
示例
api.describeTask({
  // ...

  // Optional parameters (inquirer prompts)
  prompts: [
    {
      name: 'open',
      type: 'confirm',
      default: false,
      description: 'Open browser on server start'
    },
    {
      name: 'mode',
      type: 'list',
      default: 'development',
      choices: [
        {
          name: 'development',
          value: 'development'
        },
        {
          name: 'production',
          value: 'production'
        },
        {
          name: 'test',
          value: 'test'
        }
      ],
      description: 'Specify env mode'
    }
  ]
})
有关更多信息,请参阅 提示。
任务钩子
有几个钩子可用
onBeforeRunonRunonExit
例如,您可以使用提示的答案(见上文)为命令添加新参数
api.describeTask({
  // ...

  // Hooks
  // Modify arguments here
  onBeforeRun: async ({ answers, args }) => {
    // Args
    if (answers.open) args.push('--open')
    if (answers.mode) args.push('--mode', answers.mode)
    args.push('--dashboard')
  },
  // Immediately after running the task
  onRun: async ({ args, child, cwd }) => {
    // child: node child process
    // cwd: process working directory
  },
  onExit: async ({ args, child, cwd, code, signal }) => {
    // code: exit code
    // signal: kill signal used if any
  }
})
任务视图
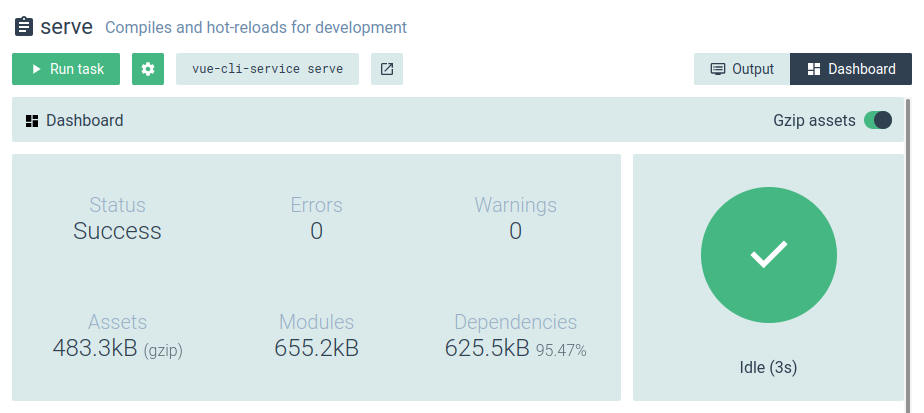
您可以使用 ClientAddon API 在任务详细信息窗格中显示自定义视图
api.describeTask({
  // ...

  // Additional views (for example the webpack dashboard)
  // By default, there is the 'output' view which displays the terminal output
  views: [
    {
      // Unique ID
      id: 'vue-webpack-dashboard-client-addon',
      // Button label
      label: 'Dashboard',
      // Button icon
      icon: 'dashboard',
      // Dynamic component to load (see 'Client addon' section below)
      component: 'vue-webpack-dashboard'
    }
  ],
  // Default selected view when displaying the task details (by default it's the output)
  defaultView: 'vue-webpack-dashboard-client-addon'
})
有关更多信息,请参阅 客户端插件。
添加新任务
您还可以使用 api.addTask 而不是 api.describeTask 添加完全新的任务,这些任务不在 package.json 脚本中。这些任务只会出现在 cli UI 中。
您需要提供 command 选项而不是 match。
示例
api.addTask({
  // Required
  name: 'inspect',
  command: 'vue-cli-service inspect',
  // Optional
  // The rest is like `describeTask` without the `match` option
  description: '...',
  link: 'https://github.com/vuejs/vue-cli/...',
  prompts: [ /* ... */ ],
  onBeforeRun: () => {},
  onRun: () => {},
  onExit: () => {},
  views: [ /* ... */ ],
  defaultView: '...'
})
⚠️ command 将运行一个节点上下文。这意味着您可以像在 package.json 脚本中一样正常调用节点 bin 命令。
提示
提示对象必须是有效的 inquirer 对象。
但是,您可以添加以下附加字段(这些字段是可选的,仅供 UI 使用)
{
  /* ... */
  // Used to group the prompts into sections
  group: 'Strongly recommended',
  // Additional description
  description: 'Enforce attribute naming style in template (`my-prop` or `myProp`)',
  // "More info" link
  link: 'https://github.com/vuejs/eslint-plugin-vue/blob/master/docs/rules/attribute-hyphenation.md',
}
支持的 inquirer 类型:checkbox、confirm、input、password、list、rawlist、editor。
除了这些之外,UI 还支持仅对它有效的特殊类型
color:显示颜色选择器。
切换示例
{
  name: 'open',
  type: 'confirm',
  default: false,
  description: 'Open the app in the browser'
}
选择示例
{
  name: 'mode',
  type: 'list',
  default: 'development',
  choices: [
    {
      name: 'Development mode',
      value: 'development'
    },
    {
      name: 'Production mode',
      value: 'production'
    },
    {
      name: 'Test mode',
      value: 'test'
    }
  ],
  description: 'Build mode',
  link: 'https://link-to-docs'
}
输入示例
{
  name: 'host',
  type: 'input',
  default: '0.0.0.0',
  description: 'Host for the development server'
}
复选框示例
显示多个开关。
{
  name: 'lintOn',
  message: 'Pick additional lint features:',
  when: answers => answers.features.includes('linter'),
  type: 'checkbox',
  choices: [
    {
      name: 'Lint on save',
      value: 'save',
      checked: true
    },
    {
      name: 'Lint and fix on commit' + (hasGit() ? '' : chalk.red(' (requires Git)')),
      value: 'commit'
    }
  ]
}
颜色选择器示例
{
  name: 'themeColor',
  type: 'color',
  message: 'Theme color',
  description: 'This is used to change the system UI color around the app',
  default: '#4DBA87'
}
调用提示
在你的 vue-cli 插件中,你可能已经有一个 `prompts.js` 文件,它会在安装插件时(使用 CLI 或 UI)向用户询问一些问题。你也可以将额外的 UI 专用字段(见上文)添加到这些提示对象中,以便在用户使用 UI 时提供更多信息。
⚠️ 目前,不支持的 inquirer 类型(见上文)在 UI 中无法正常工作。
客户端插件
客户端插件是一个 JS 包,它被动态加载到 cli-ui 中。它用于加载自定义组件和路由。
创建客户端插件
创建客户端插件的推荐方法是使用 vue cli 创建一个新项目。你可以在插件的子文件夹中或不同的 npm 包中执行此操作。
安装 `@vue/cli-ui` 作为开发依赖项。
然后添加一个 `vue.config.js` 文件,内容如下
const { clientAddonConfig } = require('@vue/cli-ui')

module.exports = {
  ...clientAddonConfig({
    id: 'org.vue.webpack.client-addon',
    // Development port (default 8042)
    port: 8042
  })
}
该 `clientAddonConfig` 方法将生成所需的 vue-cli 配置。除其他事项外,它还禁用 CSS 提取并将代码输出到客户端插件文件夹中的 `./dist/index.js`。
警告
确保正确命名空间 id,因为它必须在所有插件中都是唯一的。建议使用 反向域名表示法。
然后修改 `eslintrc.json` 文件以添加一些允许的全局对象
{
  // ...
  "globals": {
    "ClientAddonApi": false,
    "mapSharedData": false,
    "Vue": false
  }
}
现在你可以在开发时运行 `serve` 脚本,并在准备好发布插件时运行 `build` 脚本。
ClientAddonApi
打开客户端插件源代码中的 `main.js` 文件,并删除所有代码。
⚠️ 不要在客户端插件源代码中导入 Vue,请使用来自浏览器 `window` 的全局 `Vue` 对象。
以下是一个 `main.js` 代码示例
import VueProgress from 'vue-progress-path'
import WebpackDashboard from './components/WebpackDashboard.vue'
import TestView from './components/TestView.vue'

// You can install additional vue plugins
// using the global 'Vue' variable
Vue.use(VueProgress, {
  defaultShape: 'circle'
})

// Register a custom component
// (works like 'Vue.component')
ClientAddonApi.component('org.vue.webpack.components.dashboard', WebpackDashboard)

// Add routes to vue-router under a /addon/<id> parent route.
// For example, addRoutes('foo', [ { path: '' }, { path: 'bar' } ])
// will add the /addon/foo/ and the /addon/foo/bar routes to vue-router.
// Here we create a new '/addon/vue-webpack/' route with the 'test-webpack-route' name
ClientAddonApi.addRoutes('org.vue.webpack', [
  { path: '', name: 'org.vue.webpack.routes.test', component: TestView }
])

// You can translate your plugin components
// Load the locale files (uses vue-i18n)
const locales = require.context('./locales', true, /[a-z0-9]+\.json$/i)
locales.keys().forEach(key => {
  const locale = key.match(/([a-z0-9]+)\./i)[1]
  ClientAddonApi.addLocalization(locale, locales(key))
})
警告
确保正确地命名空间 ID,因为它们必须在所有插件中都是唯一的。建议使用 反向域名表示法。
cli-ui 将 `Vue` 和 `ClientAddonApi` 注册为 `window` 范围内的全局变量。
在你的组件中,你可以使用 @vue/ui 和 @vue/cli-ui 的所有组件和 CSS 类,以保持一致的外观和感觉。你还可以使用 vue-i18n(已包含)来翻译字符串。
注册客户端插件
回到 `ui.js` 文件,使用 `api.addClientAddon` 方法,并使用对构建文件夹的 require 查询
api.addClientAddon({
  id: 'org.vue.webpack.client-addon',
  // Folder containing the built JS files
  path: '@vue/cli-ui-addon-webpack/dist'
})
这将使用 nodejs `require.resolve` API 找到文件夹并提供从客户端插件构建的 `index.js` 文件。
或者在开发插件时指定一个 URL(理想情况下,你希望在测试 vue 项目中的 `vue-cli-ui.js` 文件中执行此操作)
// Useful for dev
// Will override path if already defined in a plugin
api.addClientAddon({
  id: 'org.vue.webpack.client-addon',
  // Use the same port you configured earlier
  url: 'https://:8042/index.js'
})
使用客户端插件
现在你可以在视图中使用客户端插件。例如,你可以在描述的任务中指定一个视图
api.describeTask({
  /* ... */
  // Additional views (for example the webpack dashboard)
  // By default, there is the 'output' view which displays the terminal output
  views: [
    {
      // Unique ID
      id: 'org.vue.webpack.views.dashboard',
      // Button label
      label: 'Dashboard',
      // Button icon (material-icons)
      icon: 'dashboard',
      // Dynamic component to load, registered using ClientAddonApi
      component: 'org.vue.webpack.components.dashboard'
    }
  ],
  // Default selected view when displaying the task details (by default it's the output)
  defaultView: 'org.vue.webpack.views.dashboard'
})
以下是在客户端插件代码中注册 `'org.vue.webpack.components.dashboard'` 组件(如我们之前所见)的代码
/* In `main.js` */
// Import the component
import WebpackDashboard from './components/WebpackDashboard.vue'
// Register a custom component
// (works like 'Vue.component')
ClientAddonApi.component('org.vue.webpack.components.dashboard', WebpackDashboard)
自定义视图
你可以使用 `api.addView` 方法在标准的 '项目插件'、'项目配置' 和 '项目任务' 视图下方添加一个新视图
api.addView({
  // Unique id
  id: 'org.vue.webpack.views.test',

  // Route name (from vue-router)
  // Use the same name used in the 'ClientAddonApi.addRoutes' method (see above in the Client addon section)
  name: 'org.vue.webpack.routes.test',

  // Button icon (material-icons)
  icon: 'pets',
  // You can also specify a custom image (see Public static files section below):
  // icon: 'https://:4000/_plugin/%40vue%2Fcli-service/webpack-icon.svg',

  // Button tooltip
  tooltip: 'Test view from webpack addon'
})
以下是在客户端插件代码中注册 `'org.vue.webpack.routes.test'`(如我们之前所见)的代码
/* In `main.js` */
// Import the component
import TestView from './components/TestView.vue'
// Add routes to vue-router under a /addon/<id> parent route.
// For example, addRoutes('foo', [ { path: '' }, { path: 'bar' } ])
// will add the /addon/foo/ and the /addon/foo/bar routes to vue-router.
// Here we create a new '/addon/vue-webpack/' route with the 'test-webpack-route' name
ClientAddonApi.addRoutes('org.vue.webpack', [
  { path: '', name: 'org.vue.webpack.routes.test', component: TestView }
])

共享数据
使用共享数据以简单的方式与自定义组件进行通信。
例如,Webpack 仪表盘使用此 API 在 UI 客户端和 UI 服务器之间共享构建统计信息。
在插件 `ui.js`(nodejs)中
// Set or update
api.setSharedData('com.my-name.my-variable', 'some-data')

// Get
const sharedData = api.getSharedData('com.my-name.my-variable')
if (sharedData) {
  console.log(sharedData.value)
}

// Remove
api.removeSharedData('com.my-name.my-variable')

// Watch for changes
const watcher = (value, id) => {
  console.log(value, id)
}
api.watchSharedData('com.my-name.my-variable', watcher)
// Unwatch
api.unwatchSharedData('com.my-name.my-variable', watcher)

// Namespaced versions
const {
  setSharedData,
  getSharedData,
  removeSharedData,
  watchSharedData,
  unwatchSharedData
} = api.namespace('com.my-name.')
警告
确保正确地命名空间 ID,因为它们必须在所有插件中都是唯一的。建议使用 反向域名表示法。
在自定义组件中
// Vue component
export default {
  // Sync Shared data
  sharedData () {
    return {
      // You can use `myVariable` in template
      myVariable: 'com.my-name.my-variable'
      // You can also map namespaced Shared data
      ...mapSharedData('com.my-name.', {
        myVariable2: 'my-variable2'
      })
    }
  },

  // Manual methods
  async created () {
    const value = await this.$getSharedData('com.my-name.my-variable')

    this.$watchSharedData(`com.my-name.my-variable`, value => {
      console.log(value)
    })

    await this.$setSharedData('com.my-name.my-variable', 'new-value')
  }
}
如果你使用 `sharedData` 选项,则可以通过将新值分配给相应属性来更新共享数据。
<template>
  <VueInput v-model="message"/>
</template>

<script>
export default {
  sharedData: {
    // Will sync the 'my-message' shared data on the server
    message: 'com.my-name.my-message'
  }
}
</script>
这在创建设置组件时非常有用。
插件操作
插件操作是在 cli-ui(浏览器)和插件(nodejs)之间发送的调用。
例如,你可能在自定义组件(见 客户端插件)中有一个按钮,它使用此 API 调用服务器上的某些 nodejs 代码。
在插件(nodejs)中的 `ui.js` 文件中,你可以使用 `PluginApi` 中的两种方法
// Call an action
api.callAction('com.my-name.other-action', { foo: 'bar' }).then(results => {
  console.log(results)
}).catch(errors => {
  console.error(errors)
})
// Listen for an action
api.onAction('com.my-name.test-action', params => {
  console.log('test-action called', params)
})
警告
确保正确地命名空间 ID,因为它们必须在所有插件中都是唯一的。建议使用 反向域名表示法。
你可以使用 `api.namespace`(类似于共享数据)的命名空间版本
const { onAction, callAction } = api.namespace('com.my-name.')
在客户端插件组件(浏览器)中,你可以访问 `$onPluginActionCalled`、`$onPluginActionResolved` 和 `$callPluginAction`
// Vue component
export default {
  created () {
    this.$onPluginActionCalled(action => {
      // When the action is called
      // before being run
      console.log('called', action)
    })
    this.$onPluginActionResolved(action => {
      // After the action is run and completed
      console.log('resolved', action)
    })
  },

  methods: {
    testPluginAction () {
      // Call a plugin action
      this.$callPluginAction('com.my-name.test-action', {
        meow: 'meow'
      })
    }
  }
}
进程间通信 (IPC)
IPC 代表进程间通信。此系统允许你轻松地从子进程(例如,任务!)发送消息。它非常快且轻量级。
为了在 webpack 仪表盘 UI 中显示数据,来自 `@vue/cli-service` 的 `serve` 和 `build` 命令在传递 `--dashboard` 参数时向 cli-ui nodejs 服务器发送 IPC 消息。
在你的进程代码(可以是 Webpack 插件或 nodejs 任务脚本)中,你可以使用来自 `@vue/cli-shared-utils` 的 `IpcMessenger` 类
const { IpcMessenger } = require('@vue/cli-shared-utils')

// Create a new IpcMessenger instance
const ipc = new IpcMessenger()

function sendMessage (data) {
  // Send a message to the cli-ui server
  ipc.send({
    'com.my-name.some-data': {
      type: 'build',
      value: data
    }
  })
}

function messageHandler (data) {
  console.log(data)
}

// Listen for message
ipc.on(messageHandler)

// Don't listen anymore
ipc.off(messageHandler)

function cleanup () {
  // Disconnect from the IPC network
  ipc.disconnect()
}
手动连接
const ipc = new IpcMessenger({
  autoConnect: false
})

// This message will be queued
ipc.send({ ... })

ipc.connect()
在空闲时自动断开连接(在一段时间内没有发送任何消息后)
const ipc = new IpcMessenger({
  disconnectOnIdle: true,
  idleTimeout: 3000 // Default
})

ipc.send({ ... })

setTimeout(() => {
  console.log(ipc.connected) // false
}, 3000)
连接到另一个 IPC 网络
const ipc = new IpcMessenger({
  networkId: 'com.my-name.my-ipc-network'
})
在 vue-cli 插件 `ui.js` 文件中,你可以使用 `ipcOn`、`ipcOff` 和 `ipcSend` 方法
function onWebpackMessage ({ data: message }) {
  if (message['com.my-name.some-data']) {
    console.log(message['com.my-name.some-data'])
  }
}

// Listen for any IPC message
api.ipcOn(onWebpackMessage)

// Don't listen anymore
api.ipcOff(onWebpackMessage)

// Send a message to all connected IpcMessenger instances
api.ipcSend({
  webpackDashboardMessage: {
    foo: 'bar'
  }
})
本地存储
插件可以从 ui 服务器使用的本地 lowdb 数据库中保存和加载数据。
// Store a value into the local DB
api.storageSet('com.my-name.an-id', { some: 'value' })

// Retrieve a value from the local DB
console.log(api.storageGet('com.my-name.an-id'))

// Full lowdb instance
api.db.get('posts')
  .find({ title: 'low!' })
  .assign({ title: 'hi!'})
  .write()

// Namespaced helpers
const { storageGet, storageSet } = api.namespace('my-plugin.')
警告
确保正确地命名空间 ID,因为它们必须在所有插件中都是唯一的。建议使用 反向域名表示法。
通知
你可以使用用户操作系统通知系统显示通知
api.notify({
  title: 'Some title',
  message: 'Some message',
  icon: 'path-to-icon.png'
})
有一些内置图标
'done''error'
进度屏幕
你可以显示一个带有文本和进度条的进度屏幕
api.setProgress({
  status: 'Upgrading...',
  error: null,
  info: 'Step 2 of 4',
  progress: 0.4 // from 0 to 1, -1 means hidden progress bar
})
删除进度屏幕
api.removeProgress()
钩子
钩子允许对某些 cli-ui 事件做出反应。
onProjectOpen
在当前项目中首次加载插件时调用。
api.onProjectOpen((project, previousProject) => {
  // Reset data
})
onPluginReload
在重新加载插件时调用。
api.onPluginReload((project) => {
  console.log('plugin reloaded')
})
onConfigRead
在打开或刷新配置屏幕时调用。
api.onConfigRead(({ config, data, onReadData, tabs, cwd }) => {
  console.log(config.id)
})
onConfigWrite
在用户保存配置屏幕时调用。
api.onConfigWrite(({ config, data, changedFields, cwd }) => {
  // ...
})
onTaskOpen
在用户打开任务详细信息窗格时调用。
api.onTaskOpen(({ task, cwd }) => {
  console.log(task.id)
})
onTaskRun
在用户运行任务时调用。
api.onTaskRun(({ task, args, child, cwd }) => {
  // ...
})
onTaskExit
在任务退出时调用。它可以在成功或失败时调用。
api.onTaskExit(({ task, args, child, signal, code, cwd }) => {
  // ...
})
onViewOpen
在用户打开视图(如 '插件'、'配置' 或 '任务')时调用。
api.onViewOpen(({ view, cwd }) => {
  console.log(view.id)
})
建议
建议是按钮,旨在向用户提出操作建议。它们显示在顶部的工具栏中。例如,如果在应用程序中未检测到 vue-router 包,我们可以有一个按钮建议安装 vue-router。
api.addSuggestion({
  id: 'com.my-name.my-suggestion',
  type: 'action', // Required (more types in the future)
  label: 'Add vue-router',
  // This will be displayed in a details modal
  message: 'A longer message for the modal',
  link: 'http://link-to-docs-in-the-modal',
  // Optional image
  image: '/_plugin/my-package/screenshot.png',
  // Function called when suggestion is activated by user
  async handler () {
    // ...
    return {
      // By default removes the button
      keep: false
    }
  }
})
警告
确保正确命名空间 id,因为它必须在所有插件中都是唯一的。建议使用 反向域名表示法。
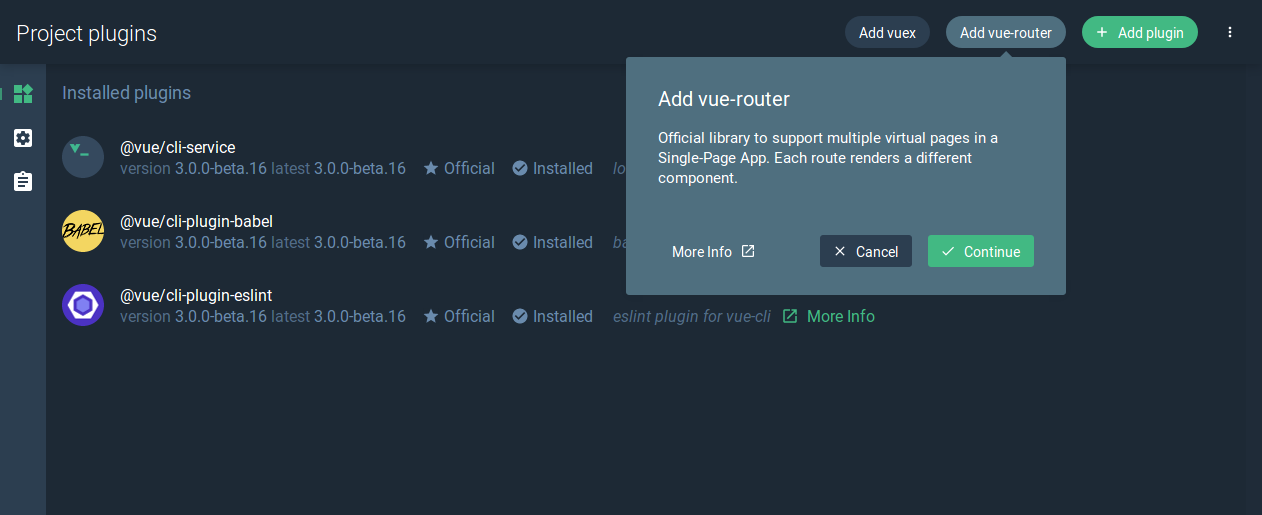
然后你可以删除建议
api.removeSuggestion('com.my-name.my-suggestion')
你也可以在用户使用 `actionLink` 激活建议时打开一个页面
api.addSuggestion({
  id: 'com.my-name.my-suggestion',
  type: 'action', // Required
  label: 'Add vue-router',
  // Open a new tab
  actionLink: 'https://vuejs.ac.cn/'
})
通常,你将使用钩子在正确的上下文中显示建议
const ROUTER = 'vue-router-add'

api.onViewOpen(({ view }) => {
  if (view.id === 'vue-project-plugins') {
    if (!api.hasPlugin('router')) {
      api.addSuggestion({
        id: ROUTER,
        type: 'action',
        label: 'org.vue.cli-service.suggestions.vue-router-add.label',
        message: 'org.vue.cli-service.suggestions.vue-router-add.message',
        link: 'https://router.vuejs.ac.cn/',
        async handler () {
          await install(api, 'router')
        }
      })
    }
  } else {
    api.removeSuggestion(ROUTER)
  }
})
在此示例中,我们仅在插件视图中显示 vue-router 建议,并且如果项目尚未安装 vue-router。
注意:`addSuggestion` 和 `removeSuggestion` 可以使用 `api.namespace()` 进行命名空间化。
小部件
你可以在插件 ui 文件中为项目仪表盘注册一个小部件
registerWidget({
  // Unique ID
  id: 'org.vue.widgets.news',
  // Basic infos
  title: 'org.vue.widgets.news.title',
  description: 'org.vue.widgets.news.description',
  icon: 'rss_feed',
  // Main component used to render the widget
  component: 'org.vue.widgets.components.news',
  // (Optional) Secondary component for widget 'fullscreen' view
  detailsComponent: 'org.vue.widgets.components.news',
  // Size
  minWidth: 2,
  minHeight: 1,
  maxWidth: 6,
  maxHeight: 6,
  defaultWidth: 2,
  defaultHeight: 3,
  // (Optional) Limit the maximum number of this widget on the dashboard
  maxCount: 1,
  // (Optional) Add a 'fullscreen' button in widget header
  openDetailsButton: true,
  // (Optional) Default configuration for the widget
  defaultConfig: () => ({
    url: 'https://vuenews.fireside.fm/rss'
  }),
  // (Optional) Require user to configure widget when added
  // You shouldn't use `defaultConfig` with this
  needsUserConfig: true,
  // (Optional) Display prompts to configure the widget
  onConfigOpen: async ({ context }) => {
    return {
      prompts: [
        {
          name: 'url',
          type: 'input',
          message: 'org.vue.widgets.news.prompts.url',
          validate: input => !!input // Required
        }
      ]
    }
  }
})
注意:`registerWidget` 可以使用 `api.namespace()` 进行命名空间化。
其他方法
hasPlugin
如果项目使用该插件,则返回 `true`。
api.hasPlugin('eslint')
api.hasPlugin('apollo')
api.hasPlugin('vue-cli-plugin-apollo')
getCwd
检索当前工作目录。
api.getCwd()
resolve
解析当前项目中的文件。
api.resolve('src/main.js')
getProject
获取当前打开的项目。
api.getProject()
requestRoute
在 Web 客户端中将用户切换到特定路由。
api.requestRoute({
  name: 'foo',
  params: {
    id: 'bar'
  }
})

api.requestRoute('/foobar')
公共静态文件
你可能需要通过 cli-ui 内置的 HTTP 服务器公开一些静态文件(通常是在你想要为自定义视图指定图标时)。
插件包文件夹根目录中可选的 `ui-public` 文件夹中的任何文件都将公开到 `/_plugin/:id/*` HTTP 路由。
例如,如果你将 `my-logo.png` 文件放入 `vue-cli-plugin-hello/ui-public/` 文件夹中,它将在 cli-ui 加载插件时通过 `/_plugin/vue-cli-plugin-hello/my-logo.png` URL 访问。
api.describeConfig({
  /* ... */
  // Custom image
  icon: '/_plugin/vue-cli-plugin-hello/my-logo.png'
})